Getting Started with User Smart List
What is a User Smart List
Most compliance frameworks require you to identify and manage specific categories of users in your environment. For example, CMMC includes controls that require organizations to separately identify privileged users (3.1.1, 3.1.6, 3.1.7, 3.5.3), service accounts and non-person entities (3.1.1), and users with access to audit systems (3.3.8, 3.3.9). Without a consolidated, up-to-date user inventory, demonstrating compliance with requirements like these can be difficult, especially when user data is spread across multiple systems.
The User Smart List is ASCERA's unified view of all users in your environment. It works by merging one or more source lookups into a single, deduplicated list that stays up to date as your sources change. Using enrichment rules, you can automatically categorize users based on naming conventions, group membership, or other attributes from your source data, making it straightforward to produce the segmented user views your compliance controls require.
Once configured, the User Smart List can be used for a variety of purposes, including:
- Managing user authorization for compliance - review and mark users as authorized or unauthorized, and track authorization status over time for audit and reporting purposes.
- Enriching user information in automations - automations have a holistic view of each user by drawing from all configured sources, so you always have the full picture without needing to query each source individually.
- Exporting evidence - pull a complete, merged view of your user population for use in compliance evidence packages and audits.
- Adding notes and categorization - annotate individual users with freeform notes and custom categories to keep track of context that lives outside your source systems.
Estimated time to complete: 30-45 minutes, depending on the number of sources you want to configure and the amount of data you need to add.
How User Smart List Merging Works
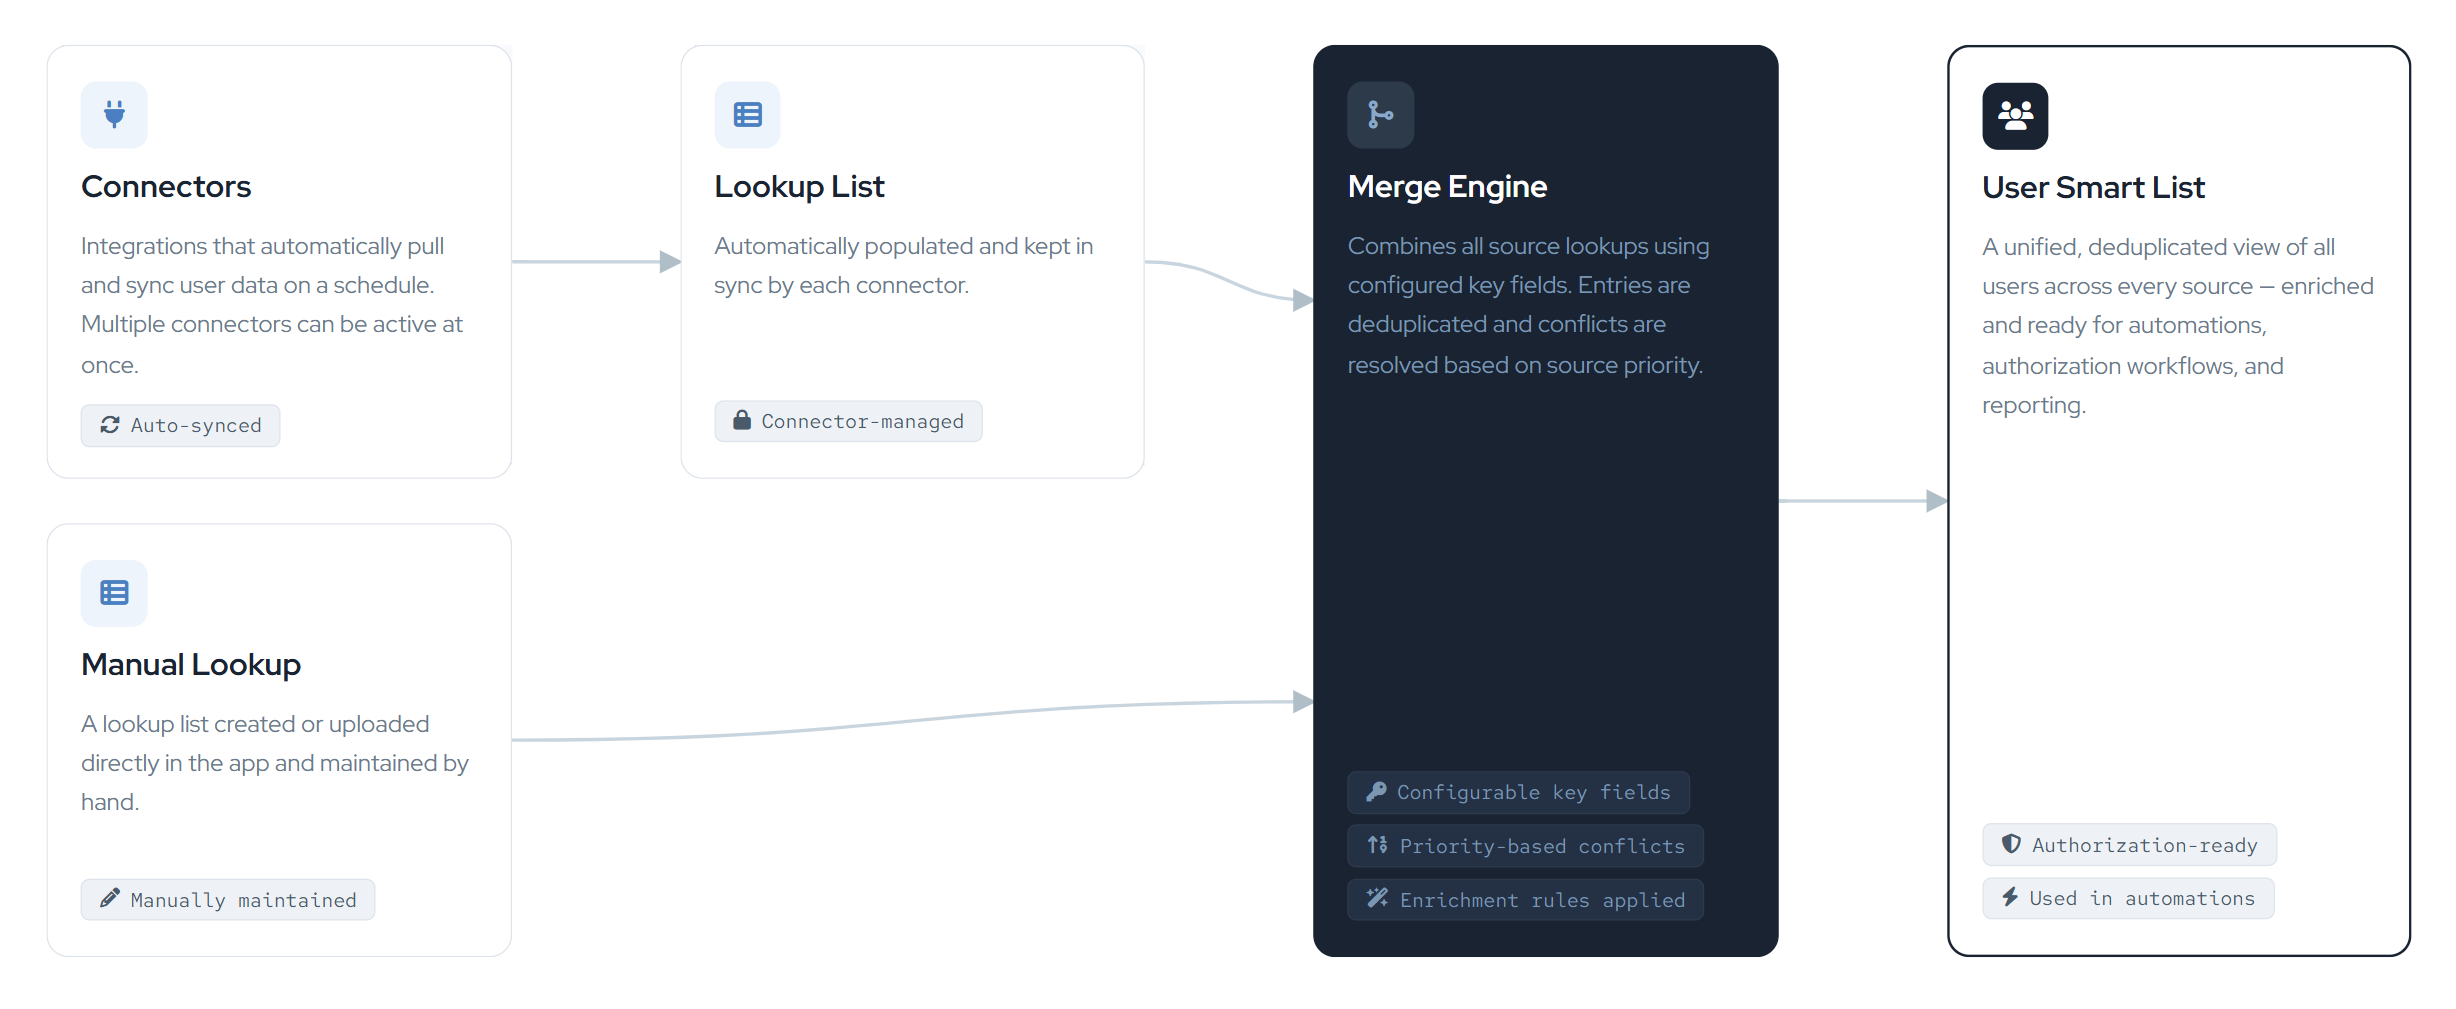
Source lookups from connectors and manual uploads are merged together using configured key fields. Entries that share matching key field values across lookups are combined into a single unified entry. Conflicts between sources are resolved based on each source's assigned priority, and enrichment rules are applied after the merge to further enrich the resulting entries.
Configuring a Source
At least one source lookup needs to be configured before the User Smart List can be populated. Sources can either be manually created lookups or lookups that are automatically populated and updated by a connector that supports lookup syncs.
Manually Created Lookup
- Navigate to Lists > Users and click the Template button in the top right to download the lookup template.
- Populate the template with your data. You don't need to fill in every column. Leave blank or remove any columns that aren't applicable. (See notes below about cells that include multiple values.)
- Save the file and navigate to Lists > Lookup Lists, then click Create Lookup List.
- Drag in your CSV, provide a name, and optionally add a description. Review the contents and click Create.
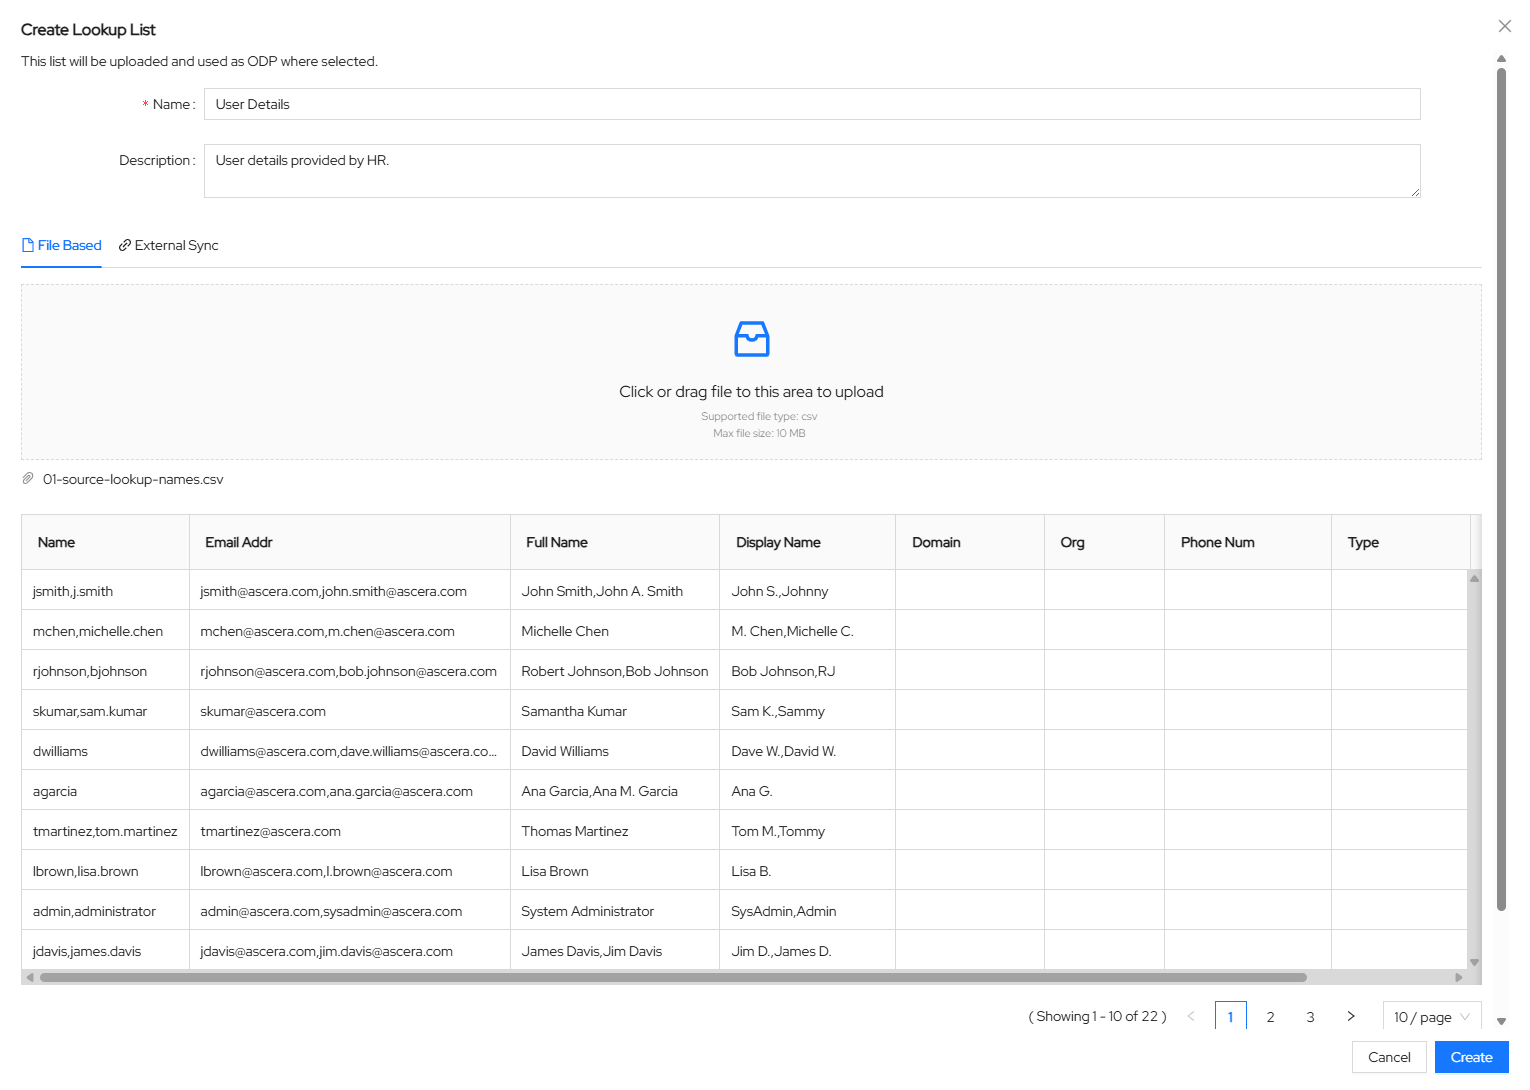
Once created, the lookup is ready to be added as a source.
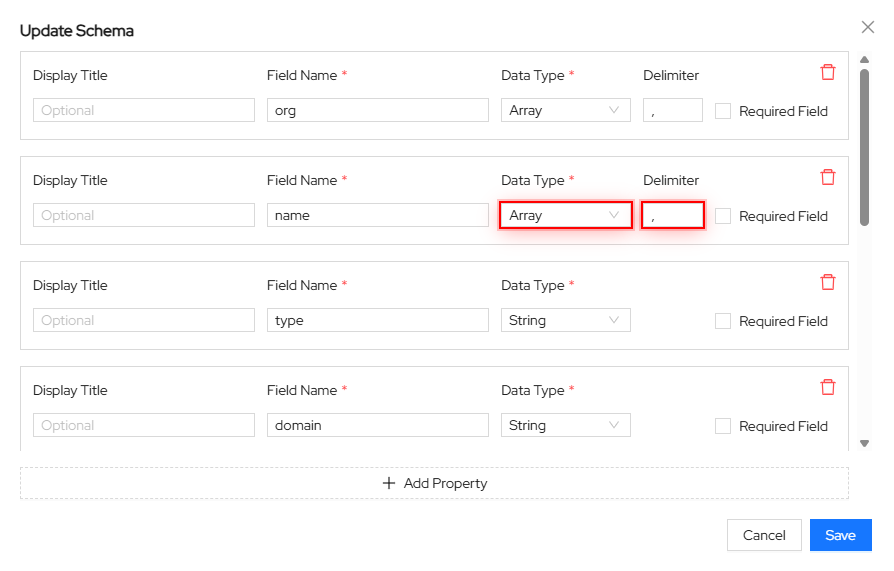
Handling Multi-Valued Cells
When working with cells that contain multiple values, you can pick a delimiter to use to separate the values in the CSV, for example, a comma (,) or a pipe (|).
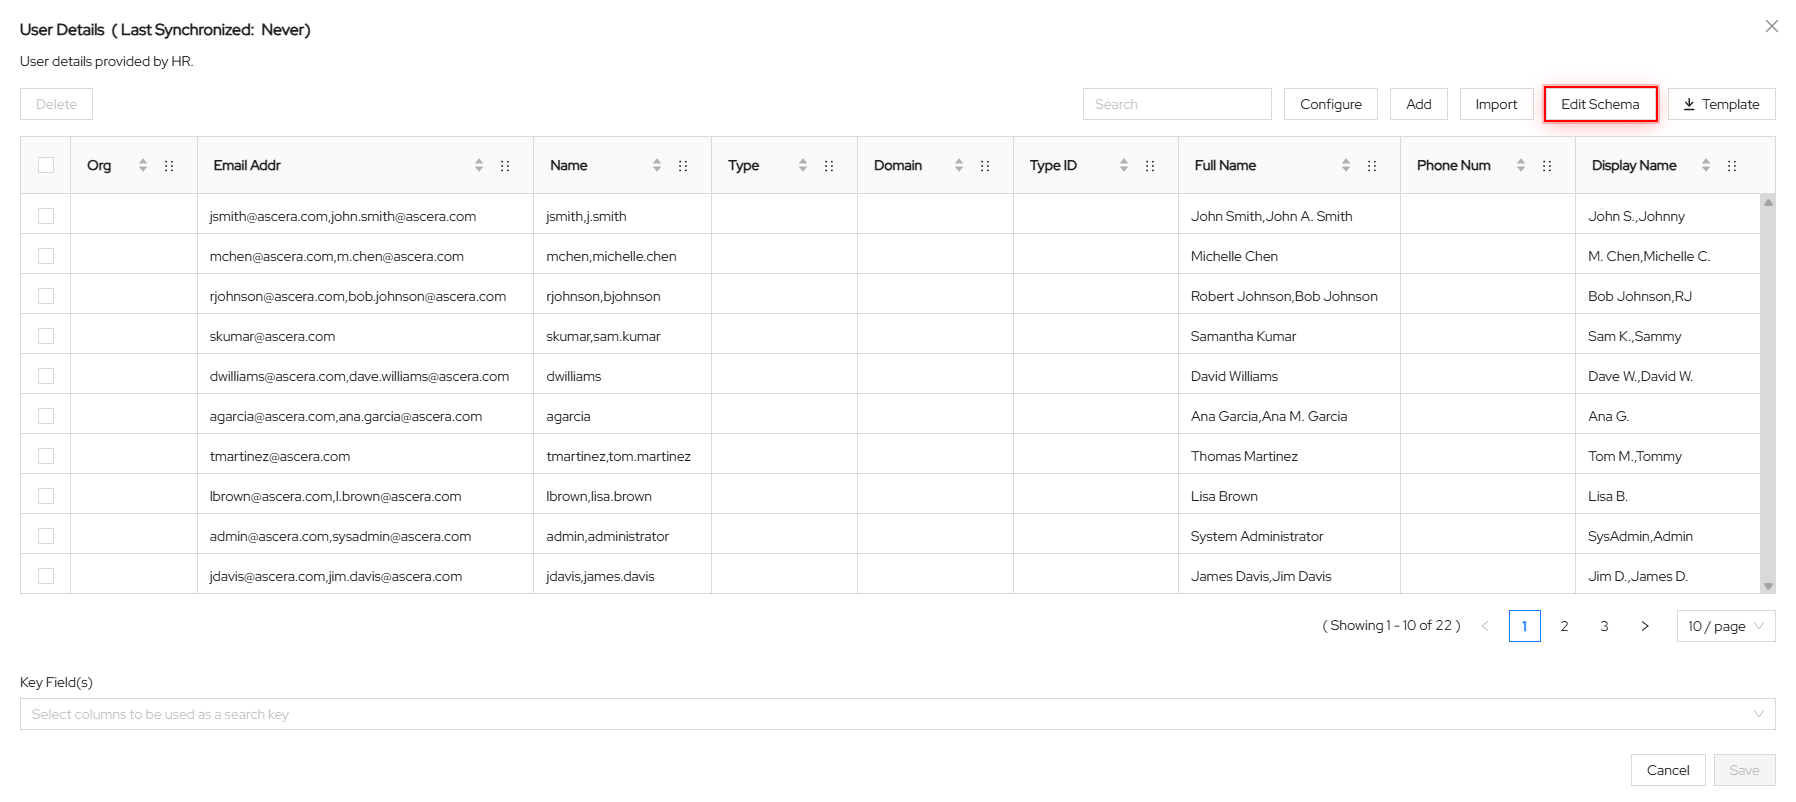
Once you've uploaded the CSV as a new lookup into ASCERA, navigate to Lists > Lookup Lists and click the newly added lookup to open it.
In the lookup modal, click the Edit Schema button.
For any fields that have multiple values, update their data type to Array and enter the appropriate delimiter.
Keep in mind that most fields in the User Smart List should have the Array data type.
Automatically Synced Lookup
Some connectors support lookup syncs, which automatically pull and update data from the connected source on a schedule.
- Navigate to ConMon: Maintain > Connectors and go to the Available tab.
- Select a connector that supports lookup syncs. This capability is indicated on the connector card.
- Follow the connector's configuration guide to complete setup. (Available via the View connector documentation link in the connector creation modal.)
Once the connector is configured, its sync lookups are automatically created and will appear in Lists > Lookup Lists. You can search by the connector name to find them.
- Click on a sync lookup and select Configure.
- Optionally enable the Synchronization Schedule toggle and select a schedule to run the sync automatically.
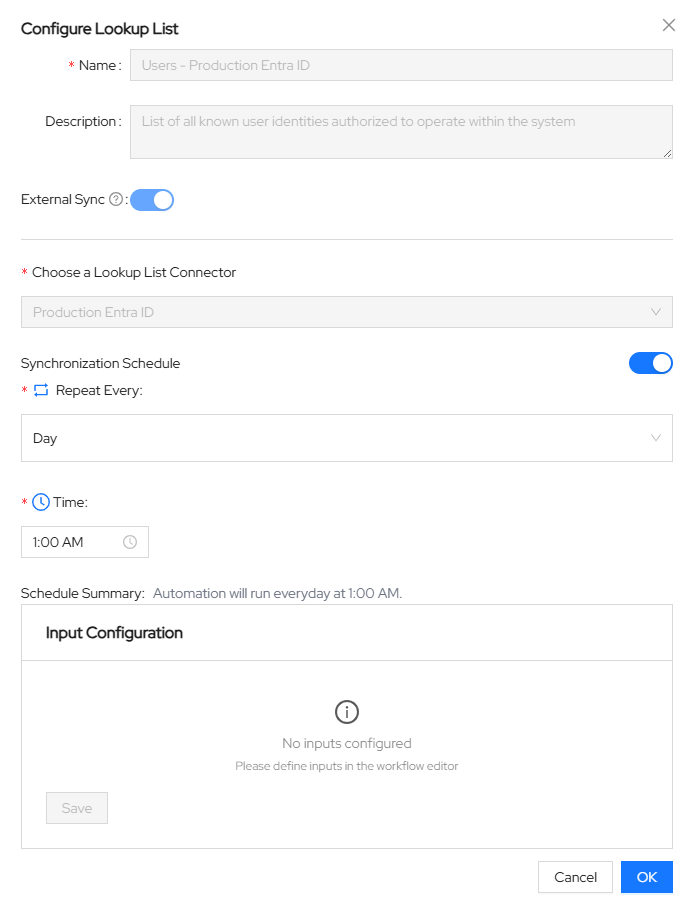
Note: Some sync lookups require additional input before they can be saved. If prompted, provide the required inputs before clicking OK.
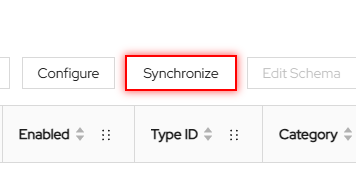
Once configured, click OK. Now you can click the Synchronize button in the lookup modal to manually trigger a sync, or wait for the schedule to run it automatically. Data will begin populating in the lookup once the sync completes.
Adding a Lookup as a Source
Once you have at least one lookup configured, you can add it as a source to the User Smart List.
- Navigate to Lists > Users and click the Sources tab.
- Click Add Source and select the lookup you want to add.
- Review the priority value. The first source added will default to priority
1, and subsequent sources will increment from there. - Click Merge to add the source and trigger a merge. New entries will appear in the Overview tab once the merge completes.

Note: Priority determines which source wins when there is a conflict on a single-value field. The source with the lowest priority number takes precedence. Priority has no effect on multi-valued fields, where all unique values are combined.
Using the User Smart List Dashboard
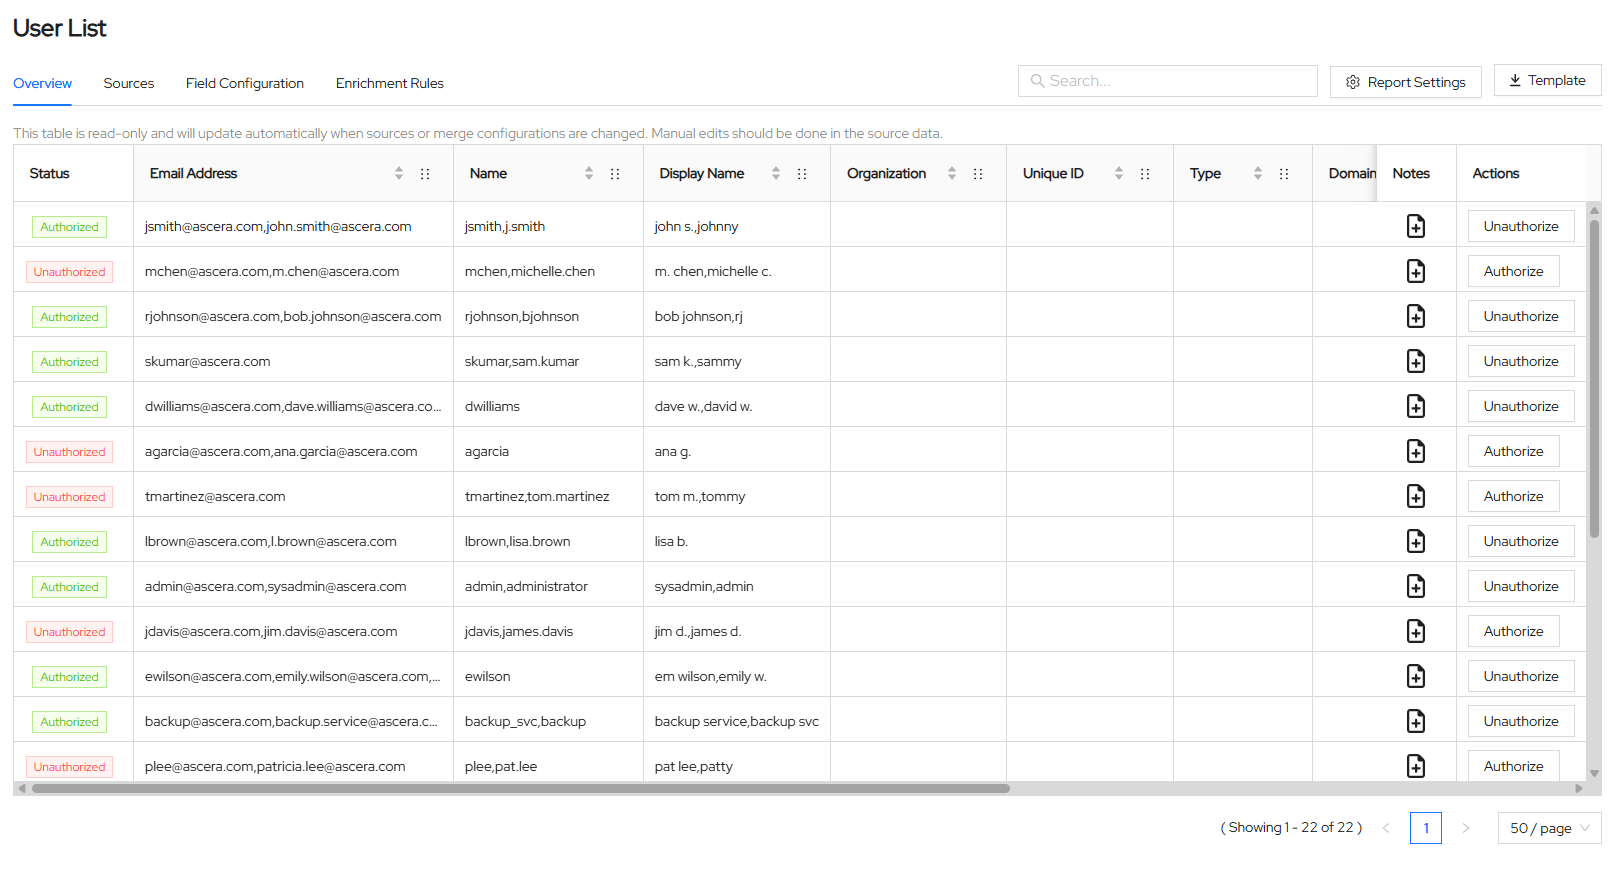
Navigate to Lists > Users. The Overview tab displays all merged user entries. You can rearrange columns and use the search bar to filter entries.
From this view, you can:
- Add freeform notes to individual entries
- Mark users as Authorized or Unauthorized
Authorization status is used in automations and can be included in reports.
Coming soon: Bulk editing authorization status, customizable visible columns, and the ability to acknowledge users without authorizing them.
Using Field Enrichment Rules
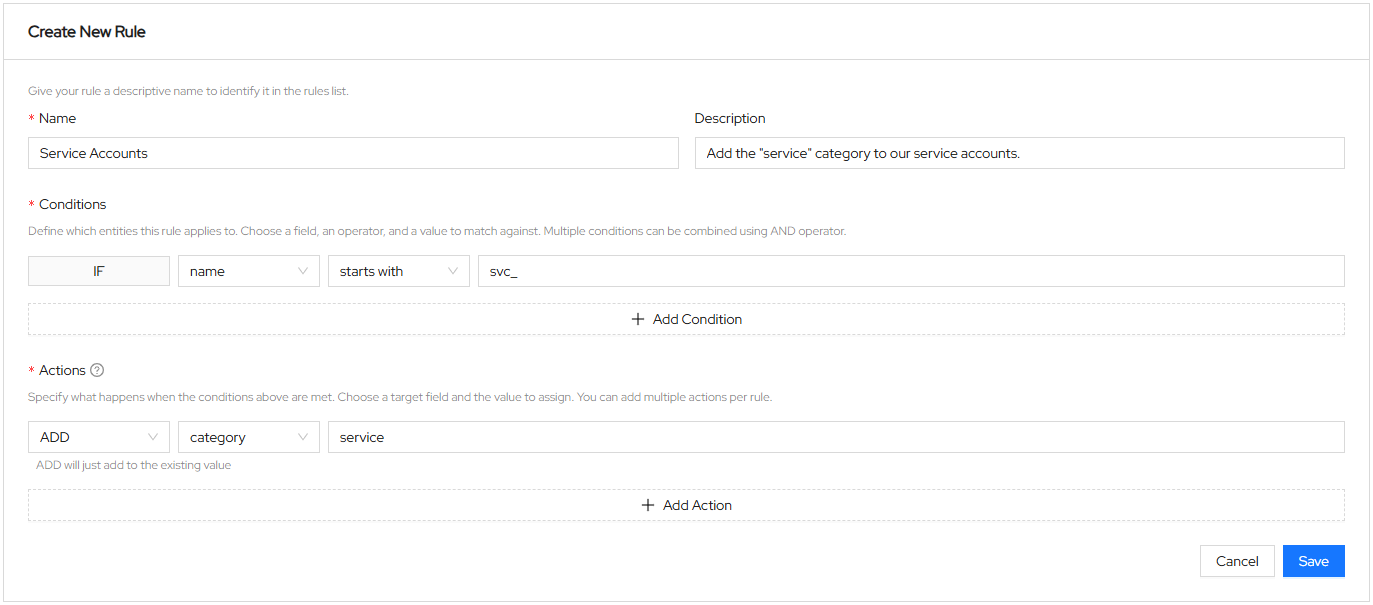
Field Enrichment Rules let you automatically populate fields in the User Smart List based on conditions you define. For example, you can automatically assign the service category to any user whose name contains svc_.
To create a new rule:
- Navigate to Lists > Users and click the Enrichment Rules tab.
- Click Create Rule.
- Provide a name and optional description.
- Configure one or more conditions.
- Configure one or more actions to take when the conditions are met.
- Click Save, or click Apply and Run to save the rule and immediately trigger a merge.
Note: For single-value fields, the SET operator replaces the existing value. For multi-valued fields, the ADD operator appends the new value without removing existing ones.
Rules are executed in order, and all matching rules are applied. If multiple rules target the same field, the last matching rule's action will be the final value for single-value fields. You can disable individual rules without deleting them.
Configuring Email Reports
Email reports help you stay on top of newly detected unauthorized users. Reports are sent when a new unauthorized user is detected, or when an existing authorization is about to expire or has expired.
To configure email reports:
- Navigate to Lists > Users and click Report Settings in the top right.
- Enable email notifications under the User Smart List section.
- Populate the recipient field. You can select existing ASCERA users or enter any email address as plain text and press Enter.
- Click Send Report to manually trigger a report at any time.

Note: For advanced scheduling, select Custom from the email frequency dropdown and enter a cron expression.
Changing the Merge Keys
Merge keys are the fields used to determine which entries from different source lookups refer to the same user and should be merged together. The default merge key configuration should work for most environments.
⚠️ Warning: Changing merge keys can have significant implications on the resulting smart list. It is strongly recommended to contact ASCERA support before making any changes to merge keys.
What are Merge Keys?
Merge keys are the fields used to determine which entries from different source lookups refer to the same user and should be merged together. If two entries share a matching value in any key field across different source lookups, they are combined into a single entry in the resulting smart list.
For example, if name and email_addr are configured as merge keys, an entry with name = john.smith in one lookup will merge with an entry that also has name = john.smith in another lookup.
The diagram below illustrates how this works using two source lookups where name and email_addr are the configured merge keys:
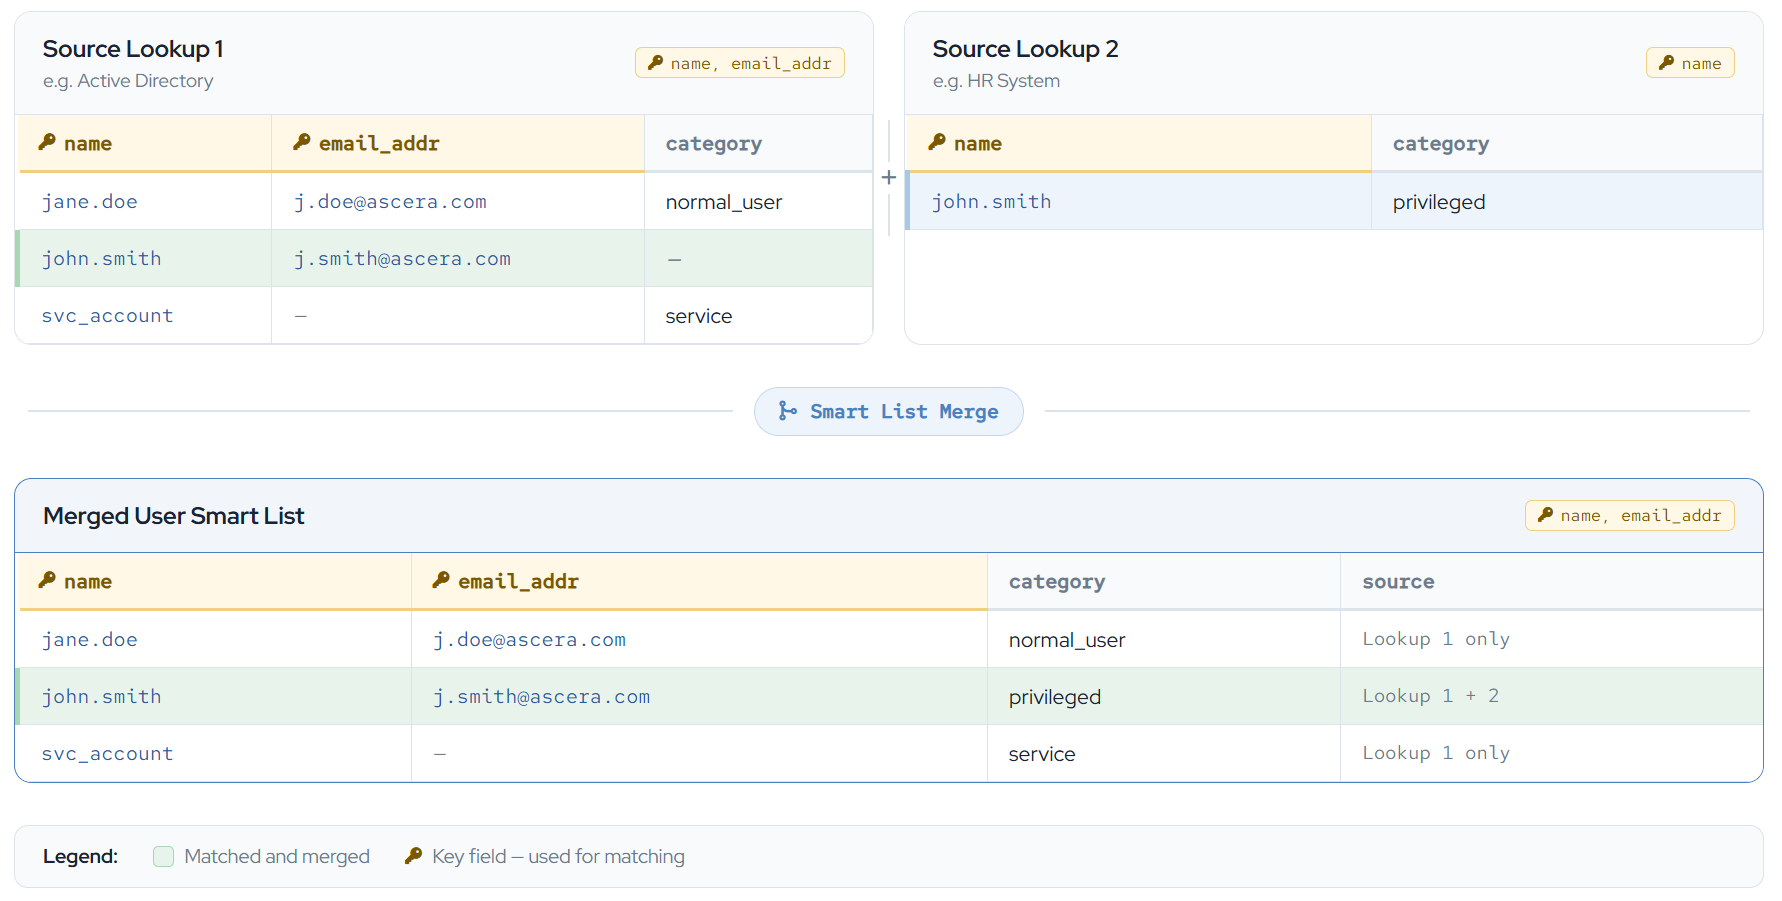
In this example:
jane.doeandsvc_accountonly exist in Source Lookup 1, so they are carried over as-is.john.smithexists in both lookups with a matchingnamevalue, so their entries are merged. Thecategoryvalue from Source Lookup 2 (privileged) is appended to the final lookup.
The final merged smart list contains all three users as unified entries, with data consolidated from both sources.
Updating Merge Keys
- Navigate to Lists > Users and click the Field Configuration tab.
- Use the Merge Key column to check or uncheck fields.
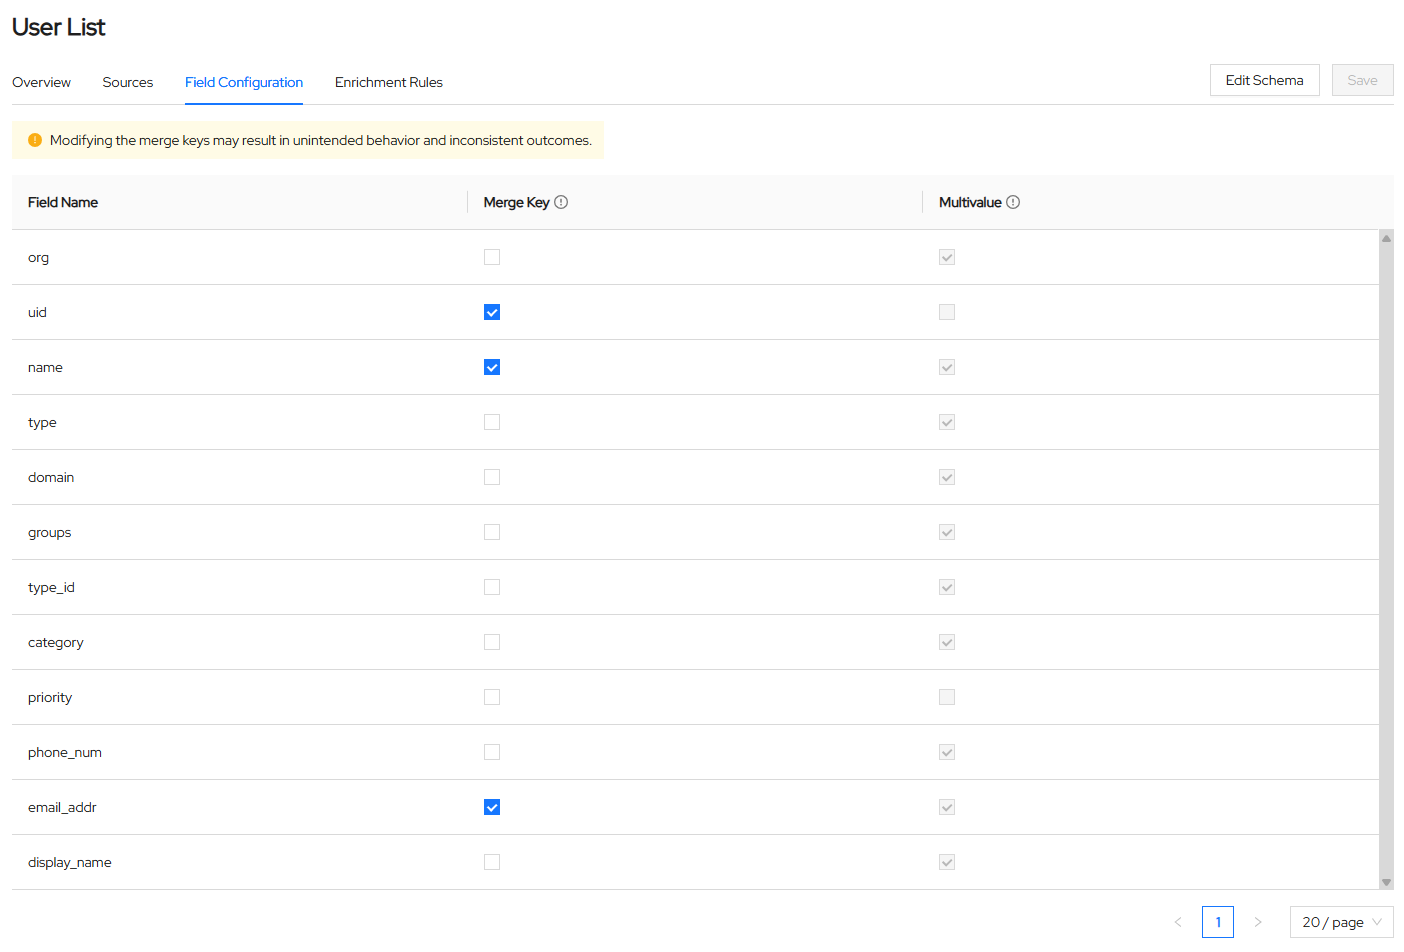
Keep in mind that changing merge keys can cause previously merged entries to split into separate entries, or cause distinct entries to collapse into one. Either outcome can result in inconsistent authorization status and notes that may be difficult to recover.