Microsoft Defender for Endpoint Connector Configuration Guide for ASCERA
The Microsoft Defender for Endpoint connector allows ASCERA to retrieve device and vulnerability data from your Defender environment via the Microsoft Defender ATP API. This guide assumes the Microsoft Entra ID connector is already configured in ASCERA. Setup here covers adding the Defender-specific API permissions to that existing app registration and entering the required values in ASCERA.
Prerequisites
- Application Administrator or Global Administrator role in the Microsoft Entra ID tenant to modify API permissions
- The Microsoft Entra ID connector must already be configured in ASCERA. The Tenant ID, Client ID, and Client Secret collected during that setup are reused here
The following values are required when configuring the connector in ASCERA:
- Tenant ID (from the Entra ID connector setup)
- Client ID (from the Entra ID connector setup)
- Client Secret (from the Entra ID connector setup)
- Environment Type:
Azure Commercial CloudorAzure US Government
Microsoft Defender for Endpoint Setup
Before you begin: Locate the Tenant ID, Client ID, and Client Secret you recorded when setting up the Microsoft Entra ID connector. You will need them to complete the ASCERA configuration at the end of this guide.
Add API Permissions
Open the app registration you created for ASCERA during the Microsoft Entra ID connector setup.
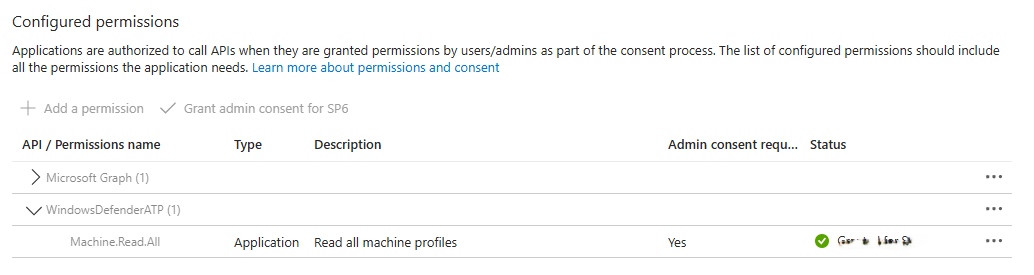
Go to Manage > API permissions, click Add a permission, and select APIs my organization uses. Search for WindowsDefenderATP and choose Application permissions. Add the following:
Machine.Read.AllMachine.Read
Click Grant admin consent for <Tenant Name> and confirm.
Without admin consent, ASCERA cannot retrieve Defender for Endpoint data.
Configure the Connector in ASCERA
Unfold ConMon: Maintain and choose Connectors, then click Create in the upper right corner. Select Microsoft Defender for Endpoint from the list of connector types.
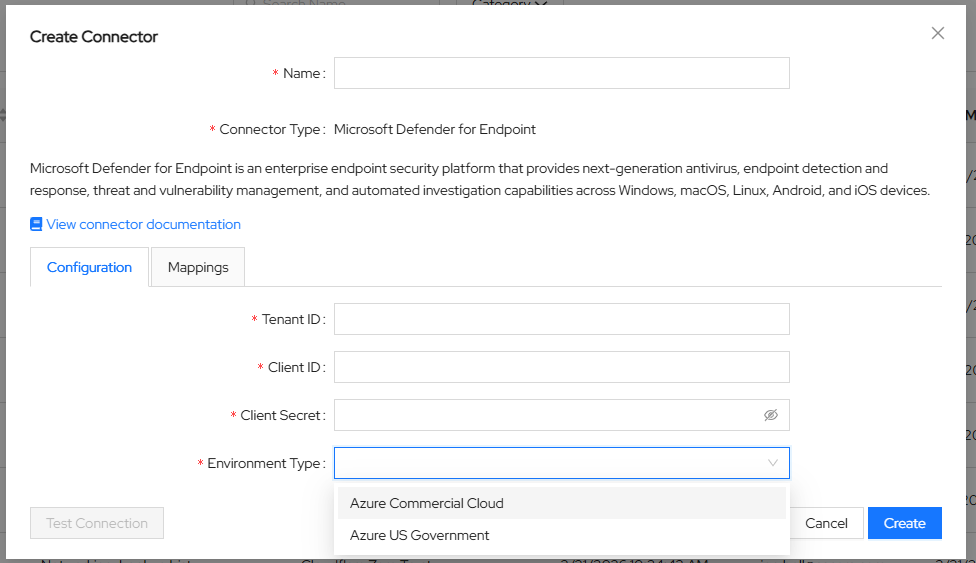
Enter the values collected above into the connector configuration:
- Name:
Microsoft Defender for Endpoint ASCERA Connector(or any name you prefer) - Tenant ID:
<Your Tenant ID> - Client ID:
<Application (client) ID> - Client Secret:
<Client Secret Value> - Environment Type:
Azure Commercial CloudorAzure US Governmentdepending on your tenant type
Save the configuration to proceed.
Test the Connection
Once all required fields are populated, the Test Connection button in the connector form becomes active. Click it to verify that ASCERA can authenticate and reach the Defender for Endpoint API before saving.

You can also validate the connector by running its mapped automations. Unfold ConMon: Maintain and choose Automations, then filter for automations associated with the newly created connector and run one to confirm data is returned successfully.
Troubleshooting
- Insufficient permissions: Verify that
Machine.Read.AllandMachine.Readare added under WindowsDefenderATP and that admin consent has been granted - Invalid client secret: Ensure the secret value (not the ID) was copied from the Entra ID connector setup
- Wrong environment type: Confirm the Environment Type matches your cloud environment (commercial vs. government)
- Wrong tenant: Confirm the Tenant ID matches the directory where the app registration was created